Final Report — 2.1 Simulator / executor for N protocol entities
Useful ressources
The github repo of the project
Here some link to better understand how work CSFM:
1. Project Overview
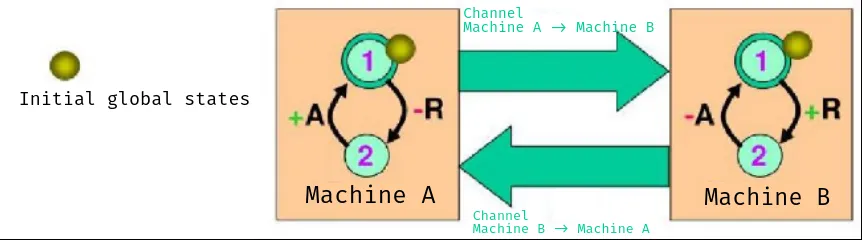
This project is about a Communicating Finite State Machine (CFSM) Protocol Simulator for N protocol entities. Its purpose is to help developers and designers conveniently investigate the behavior of communication protocols.
The simulator requires loading a single file in which the user defines each FSM individually. At least two FSMs must be defined. It then simulates their interactions either in step-by-step mode, where the user selects one of the available transitions presented by the system or in automatic mode, where the system randomly selects one of the possible transitions.
2. Language and Platform Choice
-
Language: Python 3
-
Framework: No GUI framework was used. The application runs entirely in the terminal.
-
Modules Used:
-
rich- used to create well-formatted and visually enhanced terminal output. It helps display tables, colored text, and structured information such as FSM states, transitions, and channel contents. This improves user experience, especially during step-by-step simulation. -
argparse- to handle command-line arguments and specify the input settings file -
yaml- to load the FSM definitions from structured files -
random- to randomly select transitions in automatic mode -
time- to add delays between transitions in automatic mode, improving readability
-
-
Why Python was chosen:
Everyone in the team is familiar with Python, which is why we chose it. It is an easy-to-use and readable language. Theyamlmodule simplifies the import of FSM definitions, and therichlibrary provides a user-friendly, visually enhanced terminal output. -
Platform: The simulator is cross-platform and runs on any operating system that supports Python 3. It has been tested on both Linux and macOS.
3. How the Simulator Works
3.1 How to Define FSMs in the Input File
-
Multiple FSMs are defined within the same YAML file. At least two FSMs must be defined.
-
For each FSM description, the input file requires:
-
The name of the FSM
-
The initial global state
-
The list of all states of the FSM
-
A list of transitions, where each transition includes:
-
The origin state (
from) -
The destination state (
to) -
The event type (e.g., send, receive, or silent signal)
-
The channel used to send the signal, if the transition event is a sending signal.
-
-
Example of CFSM:
Machine A:
  Initial_global_state:
    - "S1"
  States:
    - "S1"
    - "S2"
  Transitions:
    - from: "S1"
      to: "S2"
      event: "-R"
      channel: "Machine B"
    - from: "S2"
      to: "S1"
      event: "+A"
Machine B:
  Initial_global_state:
    - "S1"
  States:
    - "S1"
    - "S2"
  Transitions:
    - from: "S1"
      to: "S2"
      event: "+R"
    - from: "S2"
      to: "S1"
      event: "-A"
      channel: "Machine A"
3.2 Execution Modes Available
In both modes, the system displays:
-
The current state of each FSM
-
Available transitions of each FSM
-
The contents of all channels
-
A table of all possible transitions to be executed
Step-by-Step Mode
The user is prompted to manually select one of the available transitions at each step from the table of possible transitions.
Automatic Mode
The simulator prompts the user to specify a number of execution steps after which it will pause the simulation and ask whether to continue or stop.
During execution, the simulator randomly selects one transition from the set of all possible transitions displayed in the table of available transitions.
3.3 Channel Behavior
- FSMs communicate via channels using a FIFO policy.
Example to demonstrate FIFO behavior:
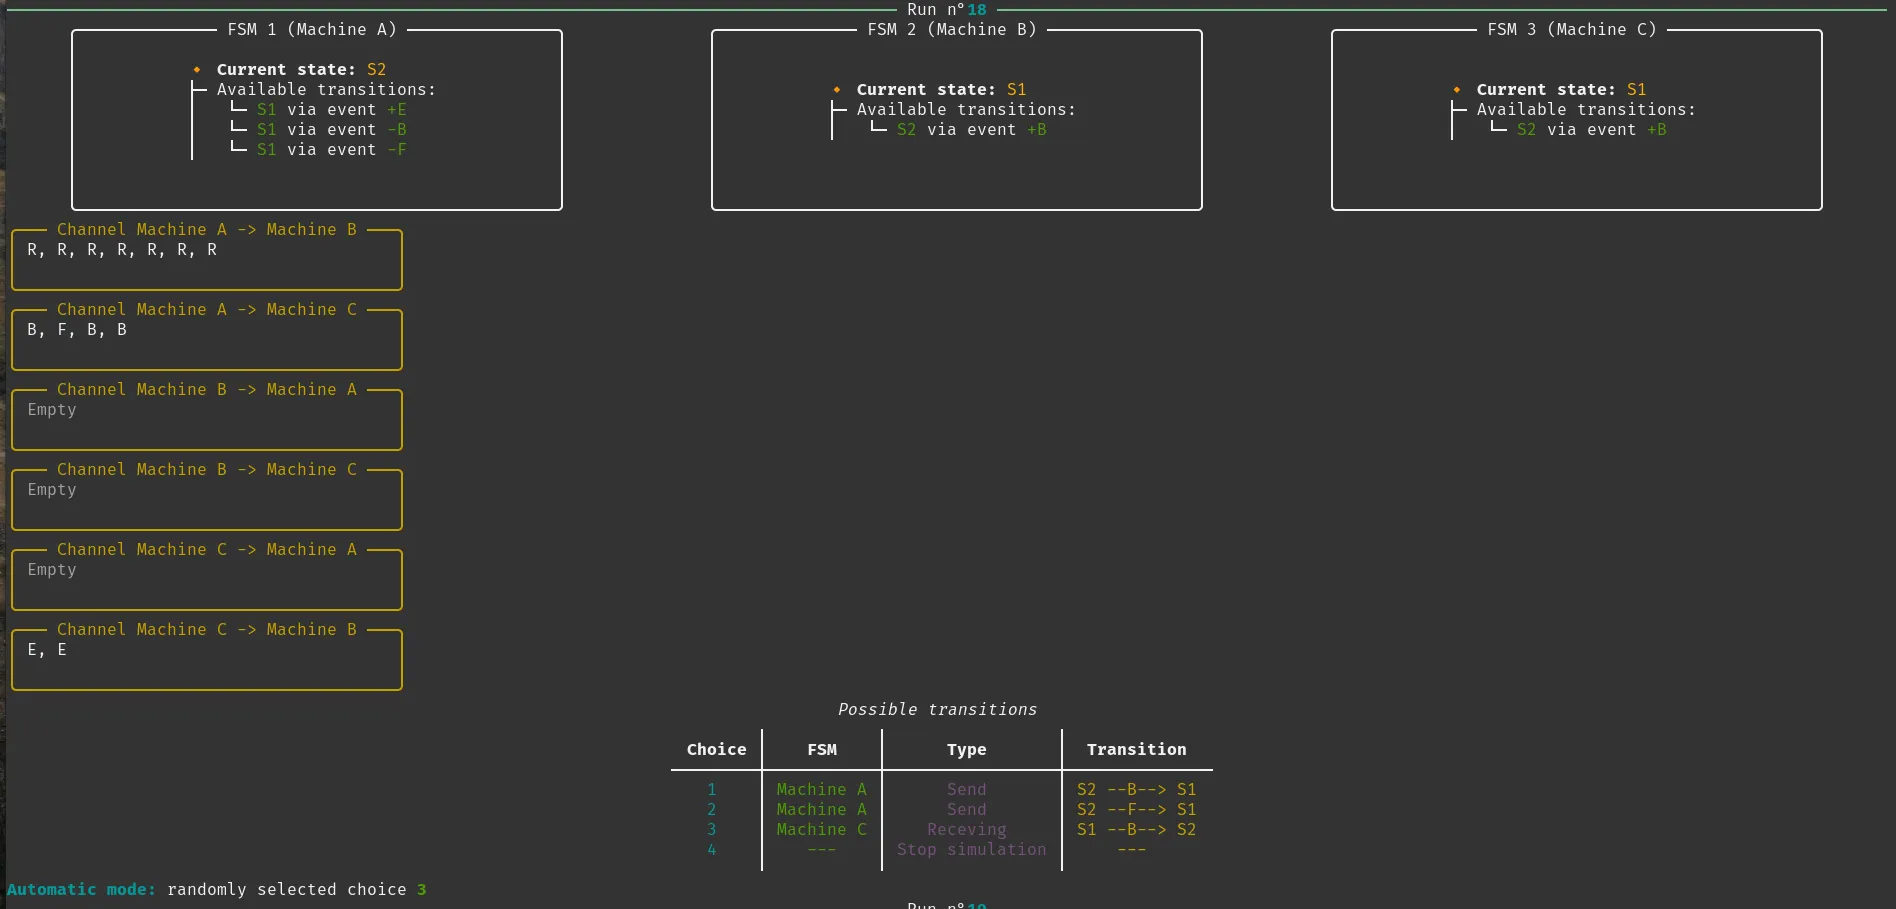


In this example, we focus on Channel Machine A → Machine C.
The automatic mode selected choice 3, which corresponds to executing a receiving transition for event B.
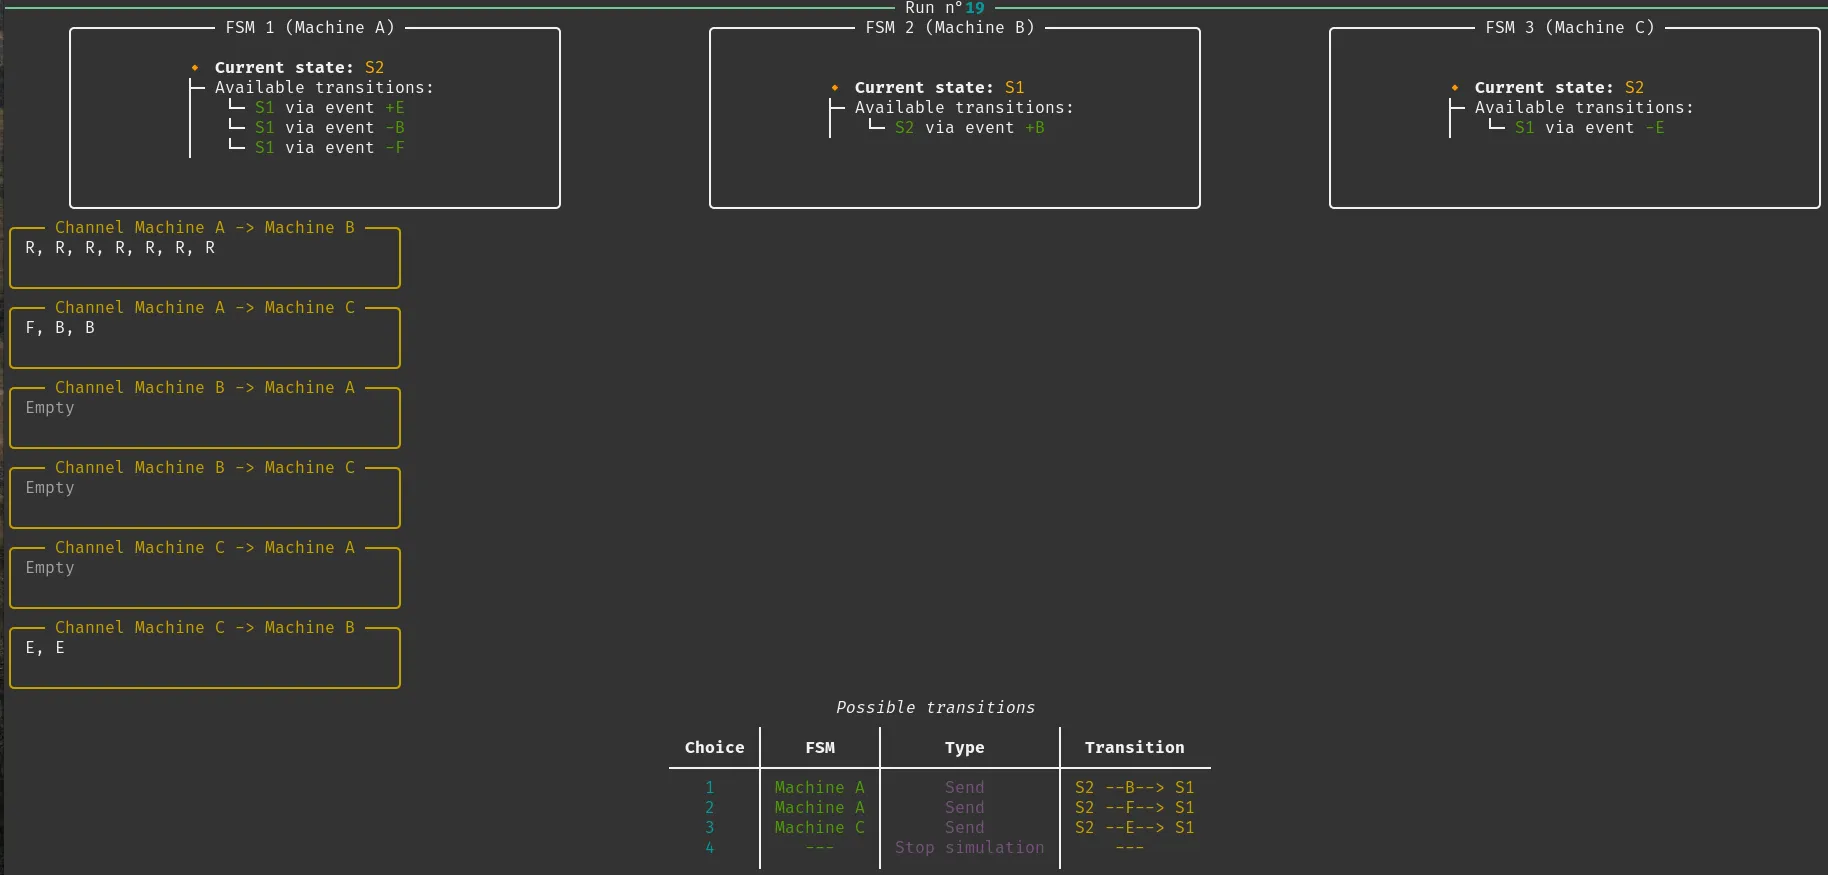

After execution, we can see that the first element in the channel (in this case, B) was “consumed”.
This confirms the FIFO (First-In, First-Out) behavior of the channel.
- Each channel is unidirectional (e.g.,
Channel A -> B) and holds sent signals until they are “consumed” by a receiving event from other FSMs that have access to this channel.
3.5 Validating User-Provided FSMs
To start the simulator, the user must provide a YAML settings file using the -s (or --settings) flag:
> python3 main.py -s
usage: main.py [-h] -s SETTINGS
main.py: error: argument -s/--settings: expected one argument
For example:
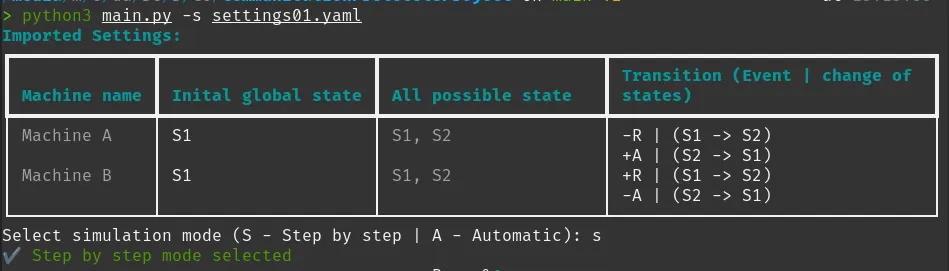
> python3 main.py -s settings01.yaml
Once the program is launched with a valid settings file, it performs the following validation checks before execution:
-
Ensures that at least two FSMs are defined in the file.
-
Verifies that each FSM includes the required sections:
-
Initial_global_state -
States -
Transitionswith the mandatory fields:from,to, andevent
-
-
Confirms that each transition is valid, specifically:
-
The
eventfield must follow Zafiropulo notation:+,-,τ,!, or? -
For sending events (
-or!), thechannelfield is mandatory, and it must point to a different FSM, not to itself -
If a transition includes a
channelparameter, it checks that it refers to an existing FSM name, different from the one where the transition is defined.
-
-
Catches and reports all validation errors with clear messages in the terminal
4. Features
Core Features Implemented
-
Supports at least 3 FSMs
-
Allows importing a single YAML file containing all automata definitions
-
Each automaton can be defined using a simple textual notation, editable with any basic text editor (e.g., Notepad)
-
FIFO-based channel communication
-
Step-by-step and automatic execution modes
-
Support send, receive and silent (τ) events
-
Clear display in the terminal showing the current global state and transition history (no GUI required)
-
Internal FSM representation used to simulate transitions and overall system behavior accurately
Additional Features
-
Supports N machines (tested with up to 5).
-
Improved display: shows available transitions for each FSM during execution.
-
Displays the imported design settings in a table at the beginning of the simulation.
-
Detects possible non-executable states at the end of the simulation:
-
Reports whether all states of each FSM have been visited.
-
If some states have not been reached, a message indicates that the FSM design may contain non-executable states.
-
If all states have been accessed, it confirms that there are no non-executable states in the design.
-
-
Detects deadlock channel:
- If no transitions are possible from the start, the simulator stops and reports an initial deadlock, also referred to as a channel deadlock.
-
Detects deadlock:
- If no further transitions are possible from the current global state, the simulation stops and reports that a deadlock is detected.
-
Detects unspecified reception errors:
- If no further transitions are possible from the current global state and if an event is present in a channel, but no FSM has a corresponding receiving transition for it, the simulation stops and reports that an unspecified reception error is detected.
5. Example of run
5.1 Example of run of 2 FSMs
For the 2-FSM configuration, the input file is named settings01.yaml and can be found in the project directory. This configuration is the same as the one presented in section 3.1.
| In step by step mode | In automatic mode |
|---|---|
 We selected the step-by-step mode 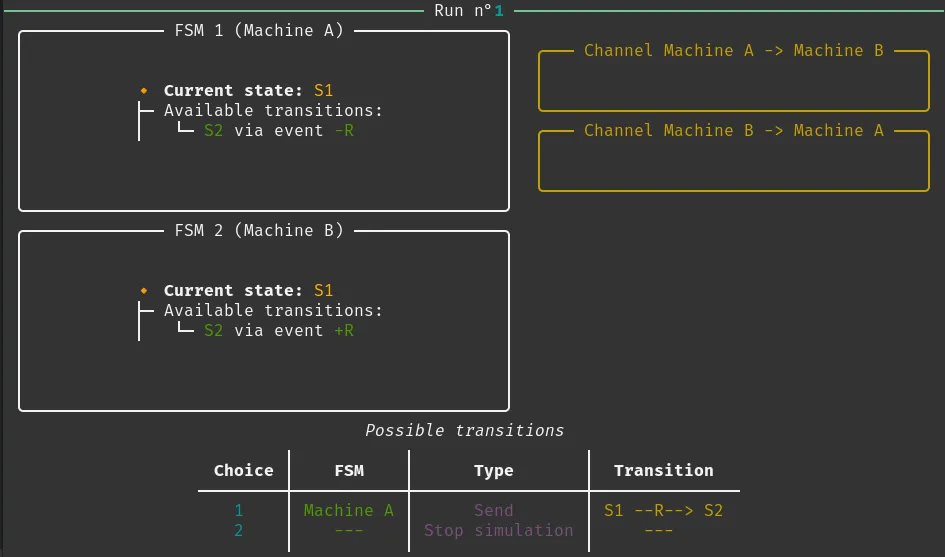 At the first step, we can see that there is only one executable transition available from Machine A We choose option no. 1  As a result, the transition is executed, and the send event is now stored in the corresponding channel 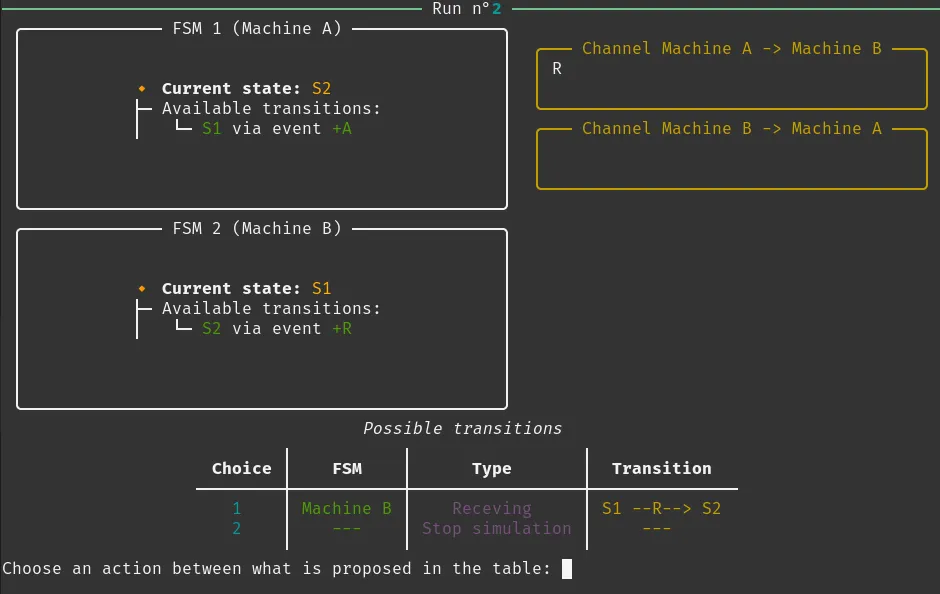 Next, only one executable transition is available again, this time a receiving event on Machine B 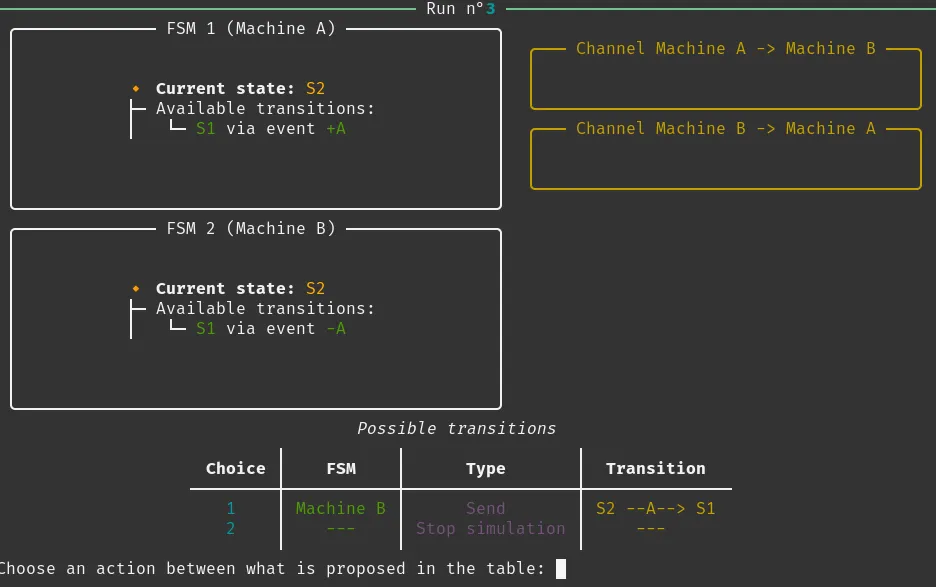 We can observe that the value 3 was “consumed” from the channel by the receiving event The design we imported into the simulation will run indefinitely until we stop it. | 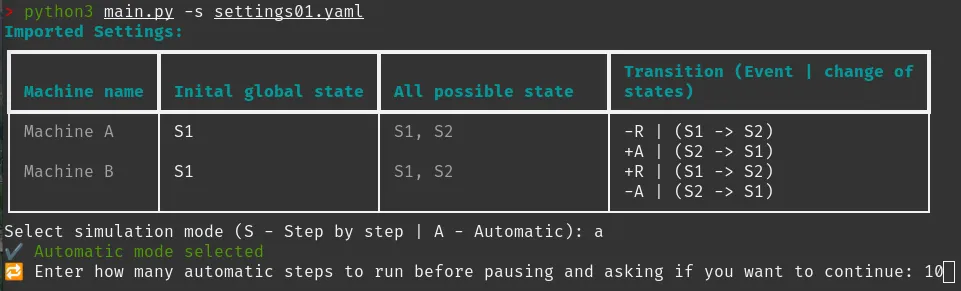 We selected the automatic mode, and defined 10 steps to run before pausing 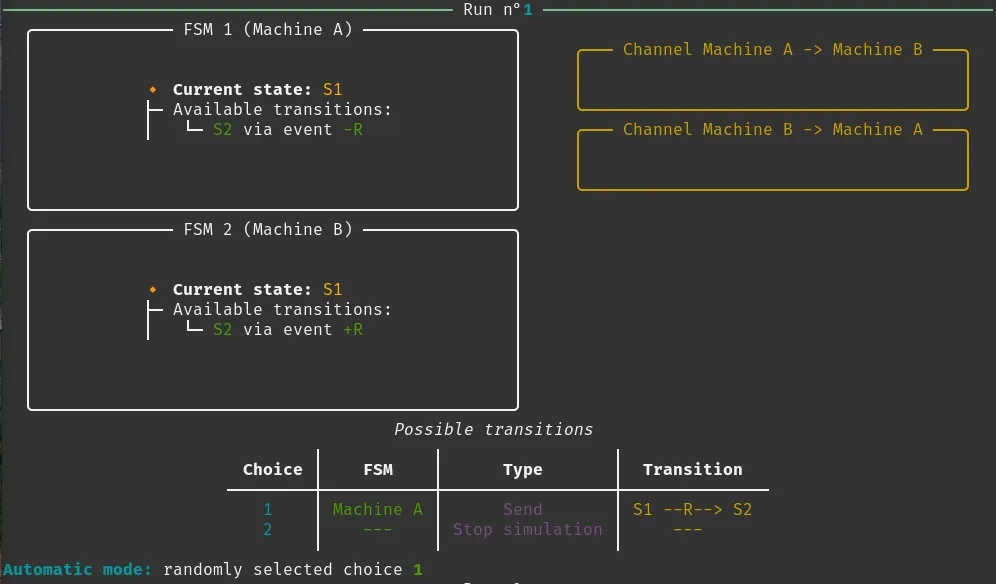 It displays for 1s and then automatically selects choice number 1 and executes it 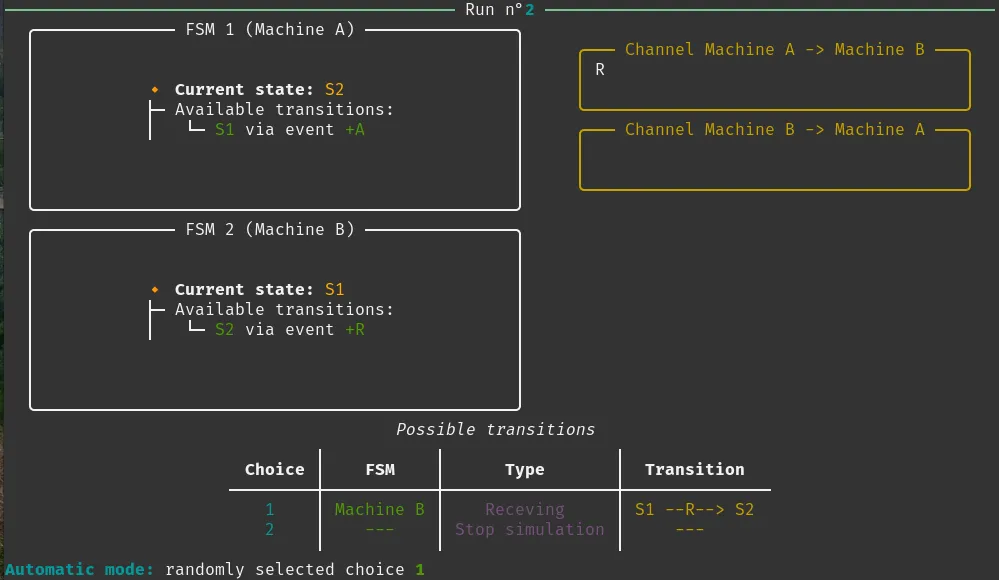 It will do the same action as in step by step mode since there is 1 possible transition to execute 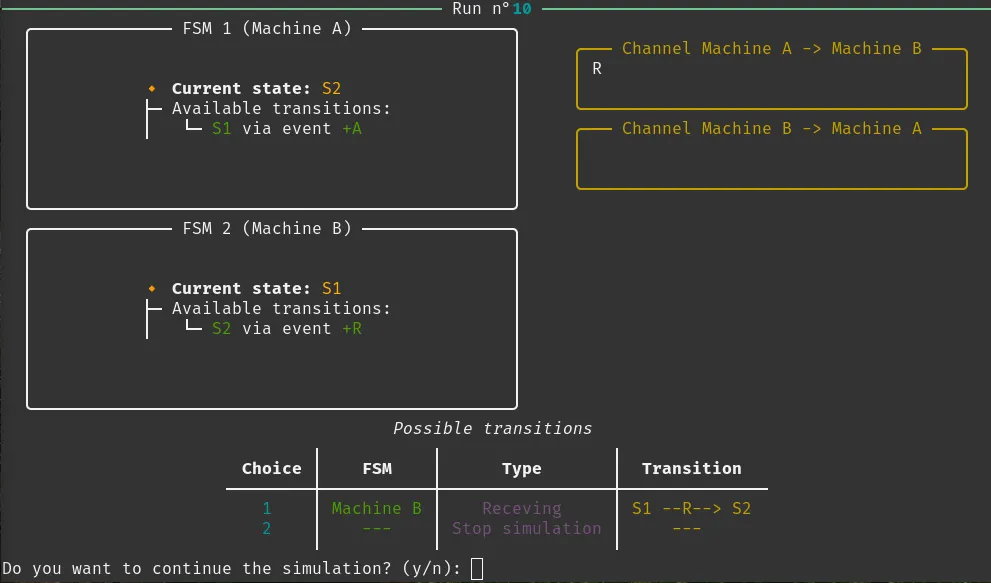 On the 10th run, it will ask if we want to continue 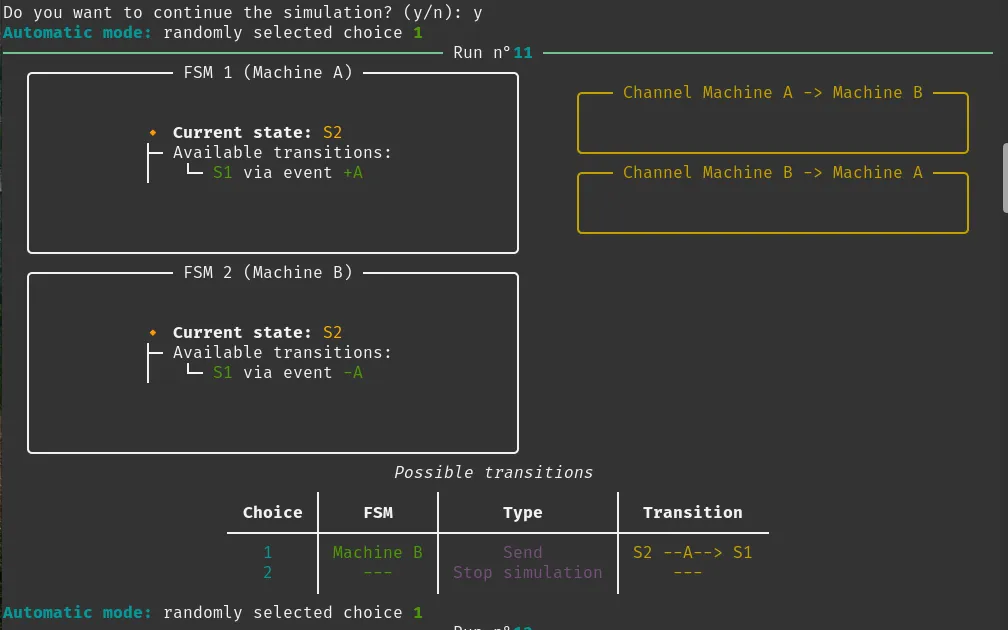 If yes, it continues for another 10 runs, or stops if no 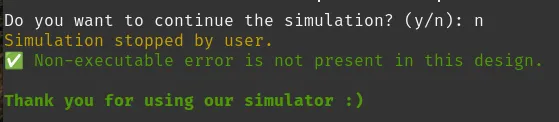 The design we imported into the simulation will run indefinitely until we stop it. |
5.2 Example of run of 3 FSMs
For the 3-FSM setup, we did not create an optimized design. However, we built a slightly more complex one to demonstrate that the simulator works properly. You can find this design in the project folder under the file named settings02.yaml.
From this point on, and for the remaining examples, we will include fewer comments on the screenshots. The behavior of the simulator was already clearly explained in the 2-FSM run example. We will now only highlight what is new or different.
| In step by step mode | In automatic mode |
|---|---|
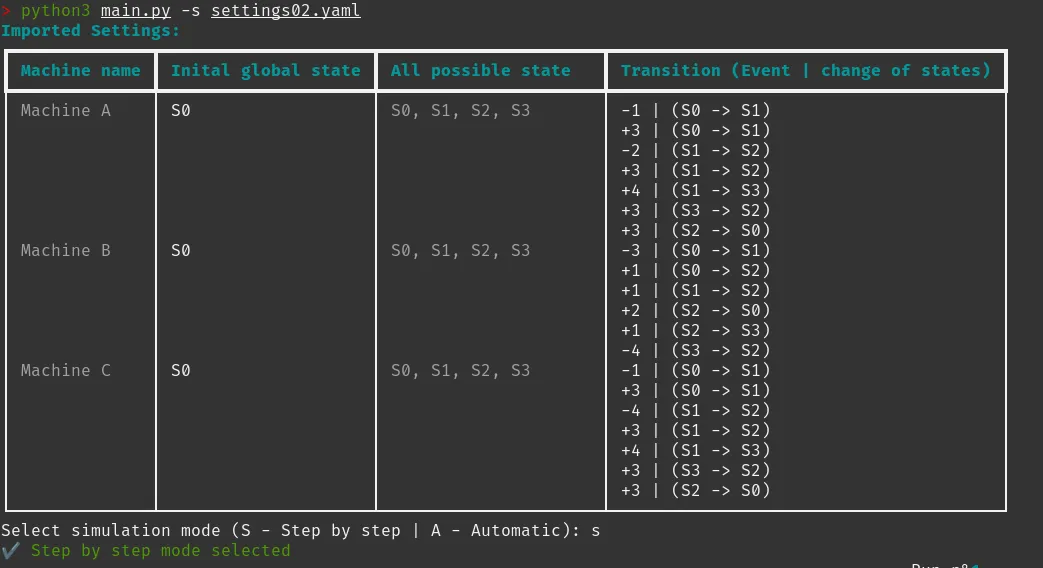 We selected the step-by-step mode 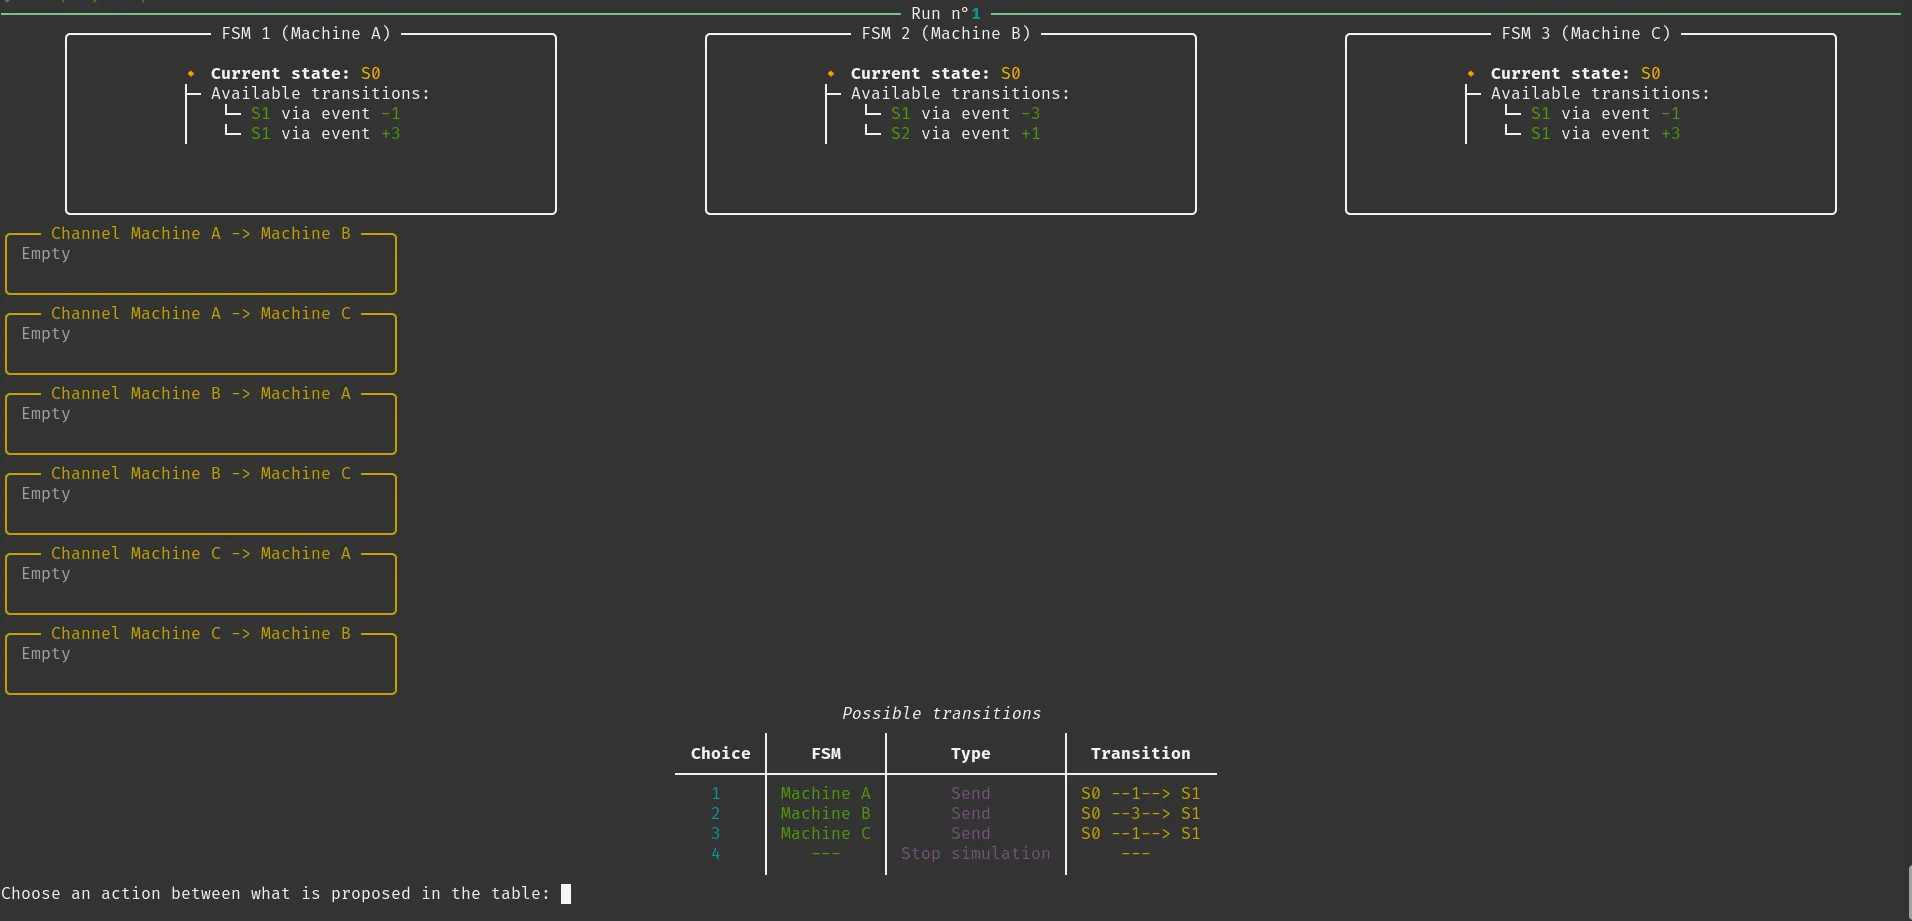 Here we can see the three FSMs along with all communication channels, displayed without any issues We chose to execute the first available transition 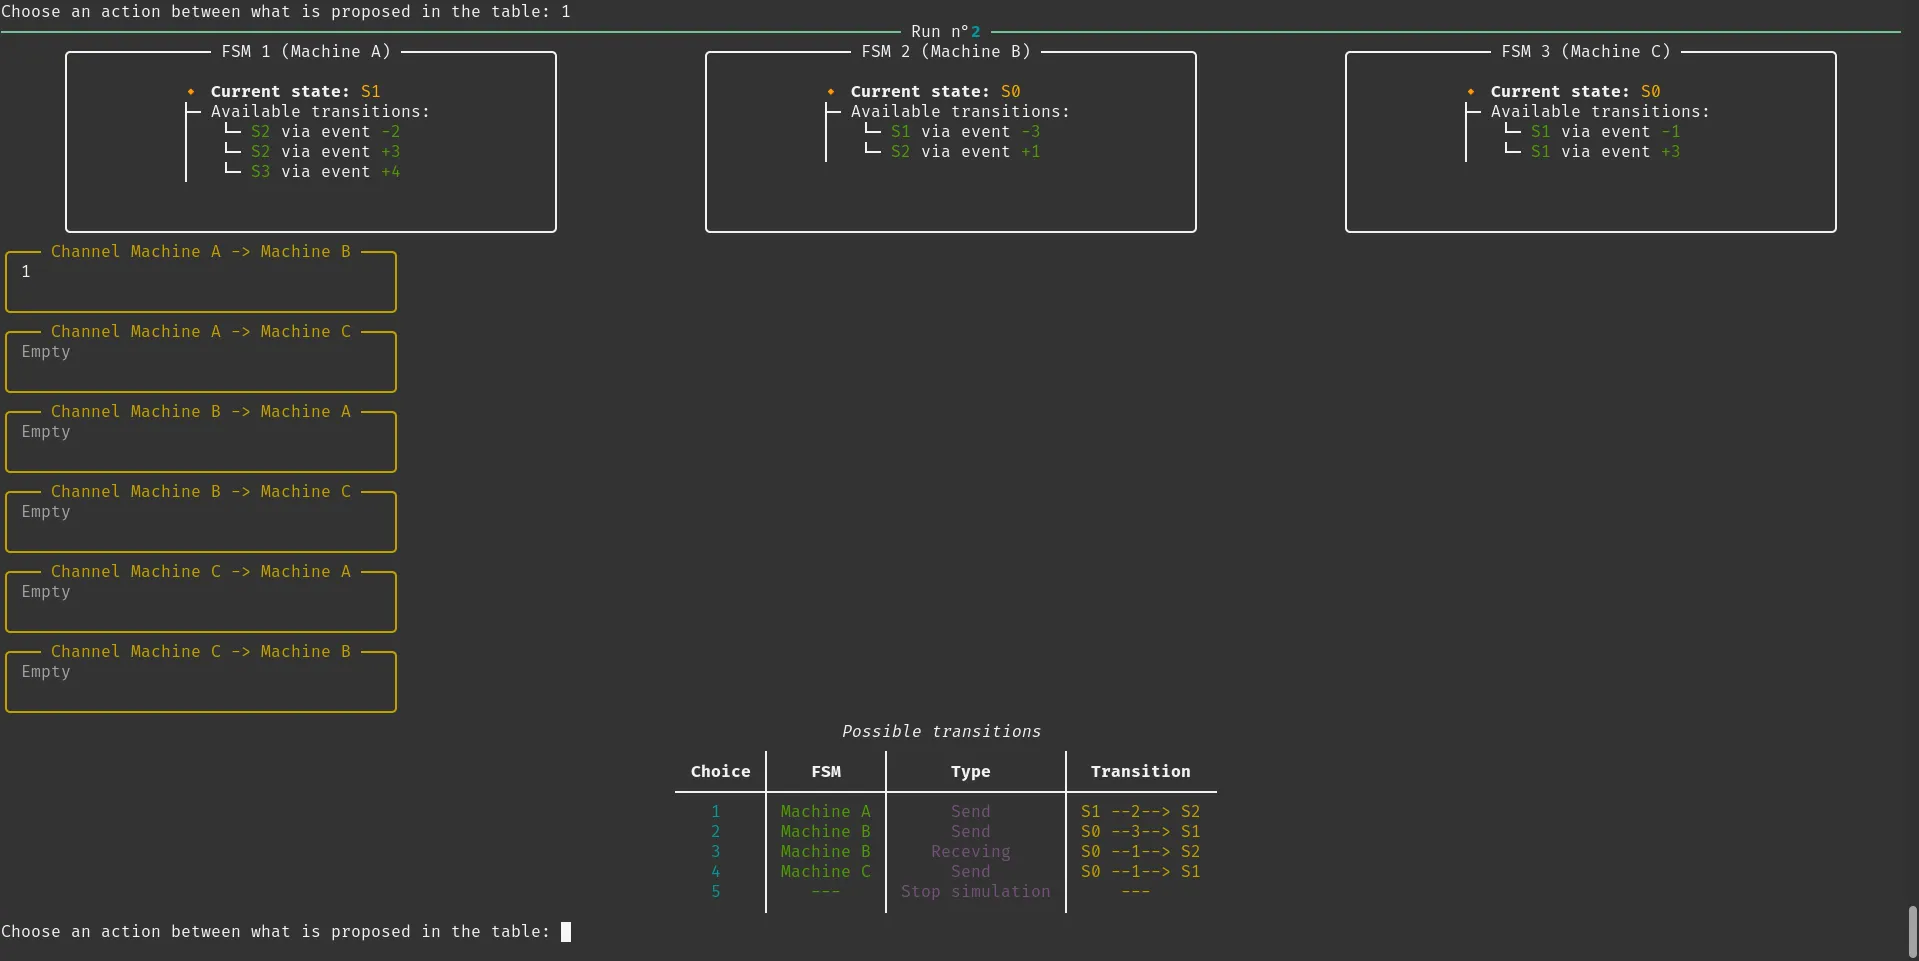 The same logic continues as the simulation progresses: we are prompted to select the next valid transition at each step. If we choose to stop the simulation after just a few steps, for example 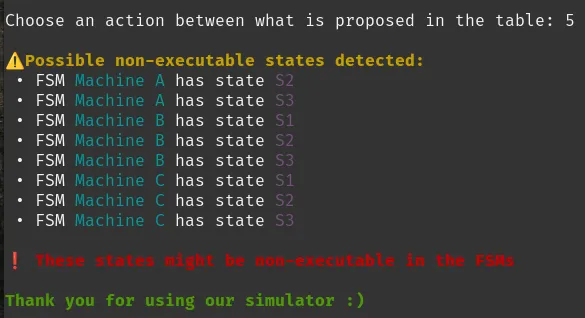 The system may report that some states might be non-executable. This is expected if the simulation hasn’t covered enough transitions, in this case, we only executed two. | 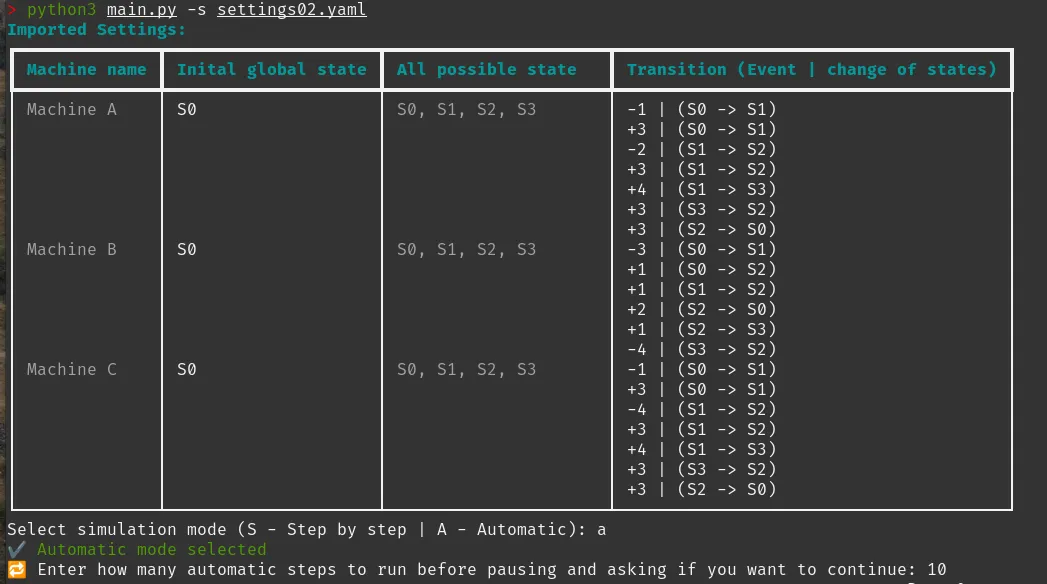 We selected the automatic mode, specifying 10 runs for this simulation 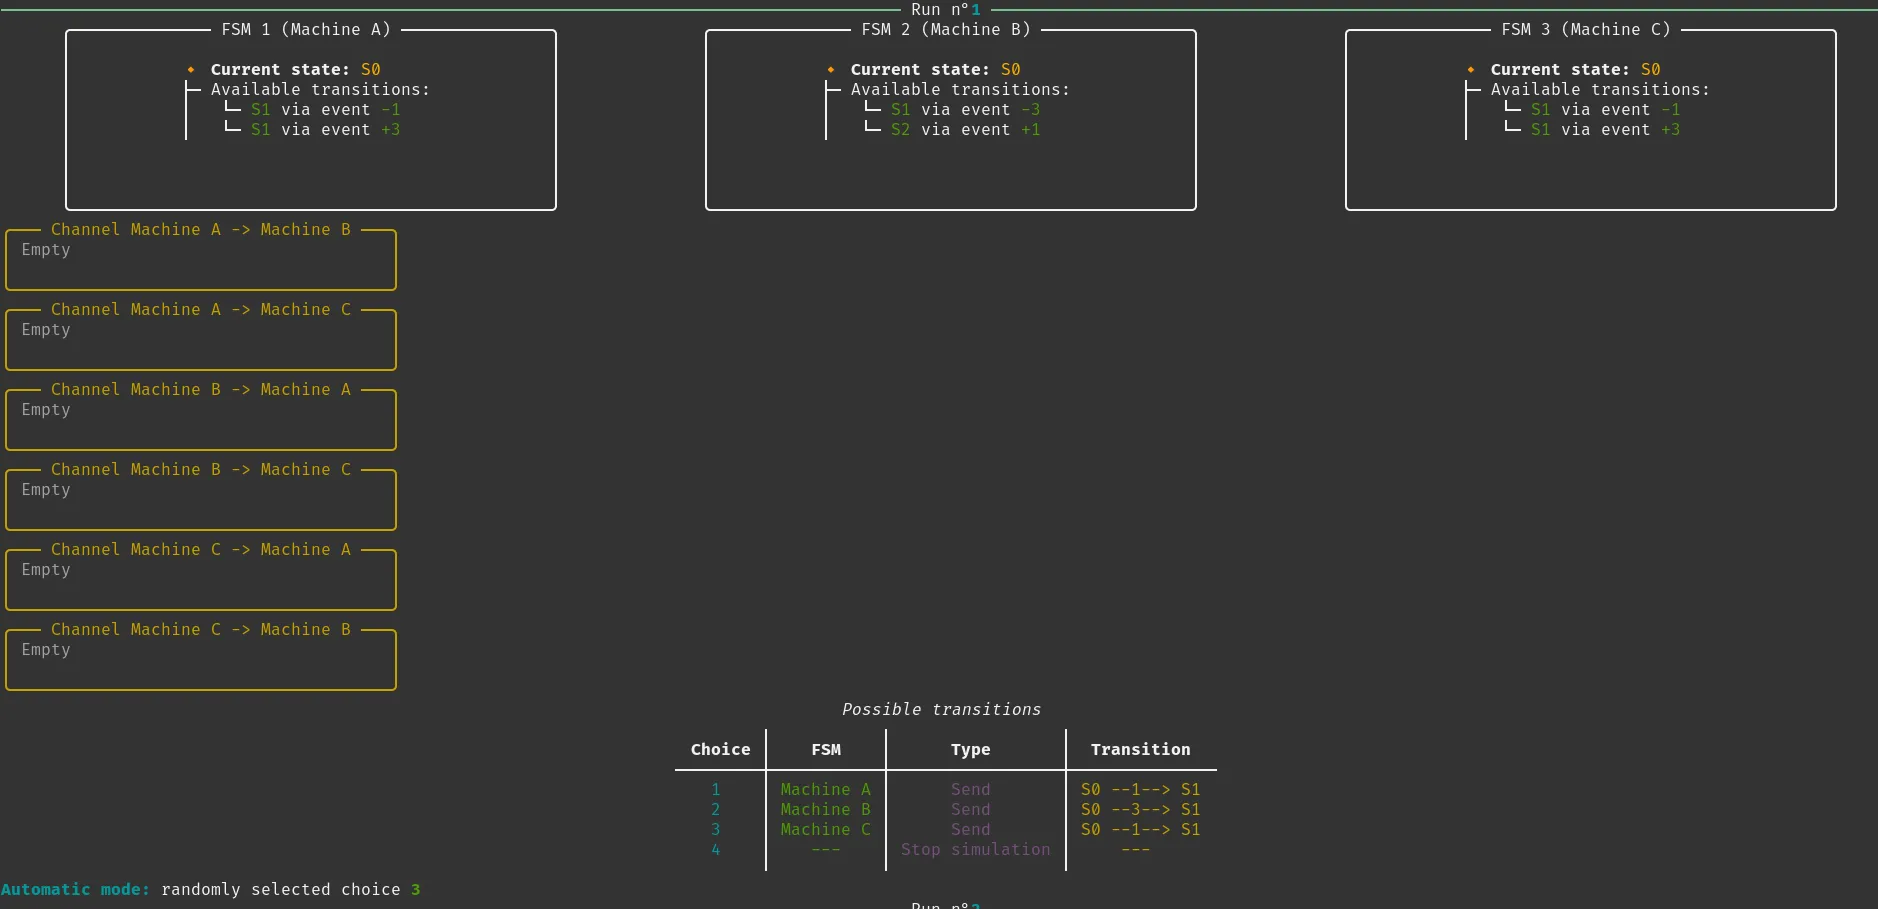 For the first run, the simulator randomly selected choice number 3 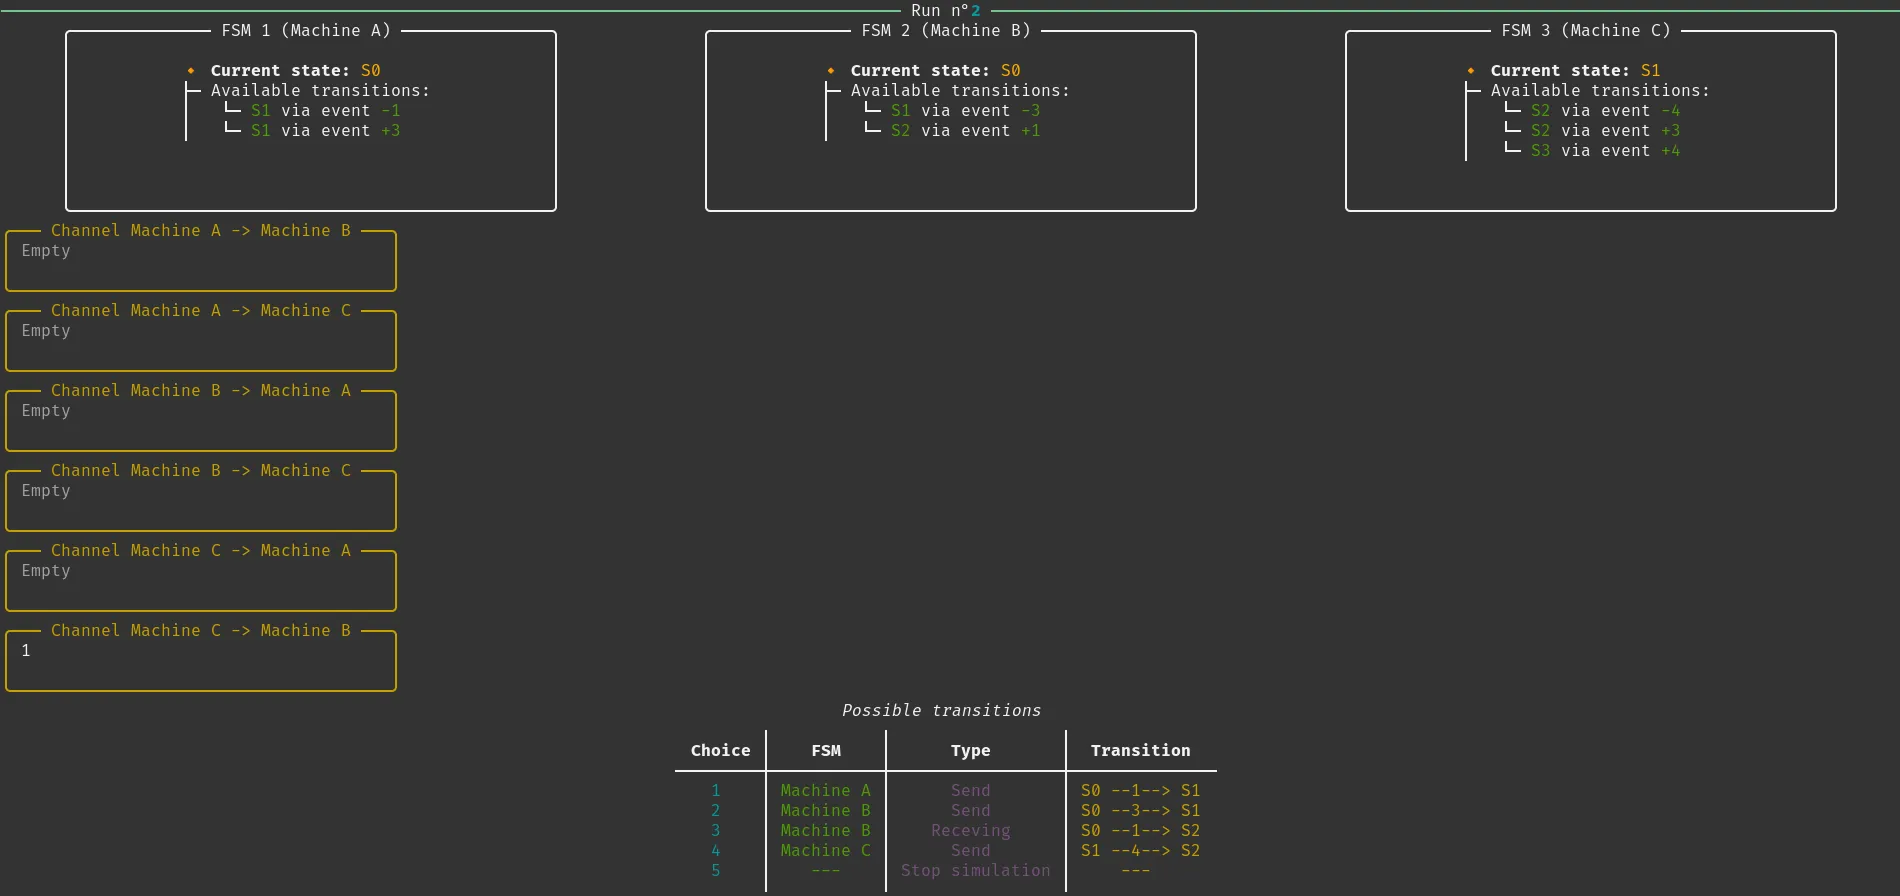 It then executed the selected transition accordingly As the simulator continues to run, we observe the execution at run number 7 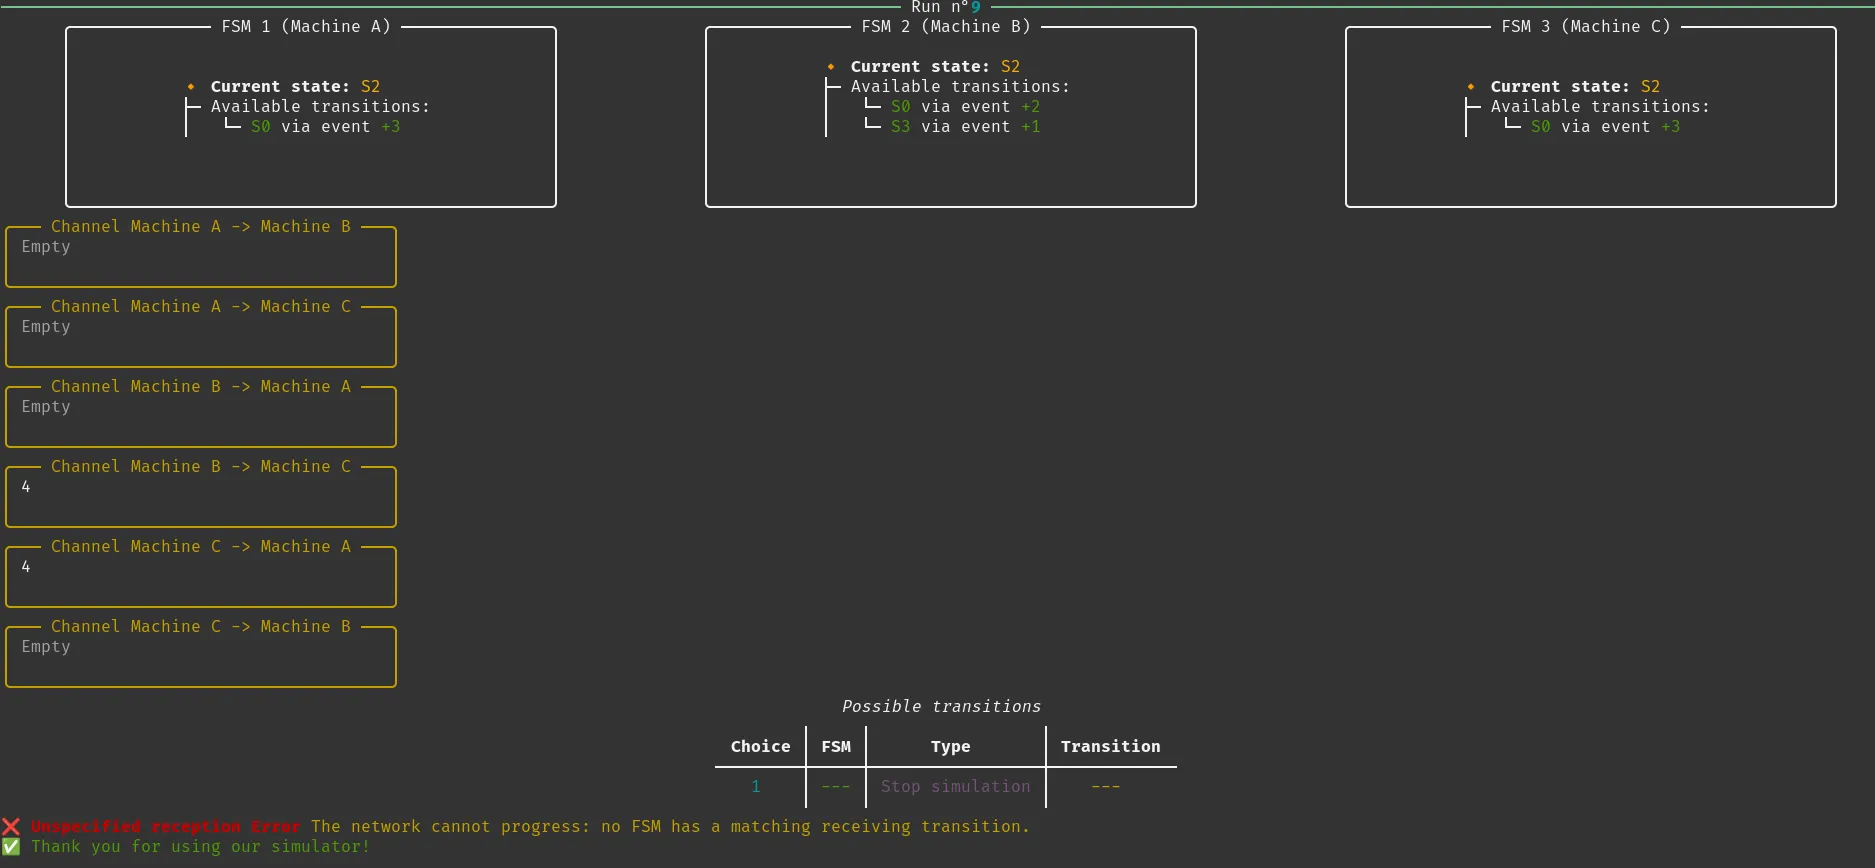  At this point, the simulator stops automatically because it detects an Unspecified Reception Error, meaning a message is present in a channel, but no FSM has a valid receiving transition for it. As a result, the simulator cannot progress further and stop. |
5.3 Example of run of 5 FSMs
The goal here is simply to demonstrate that the simulator can handle N machines without any issues. We used the file named settings03.yaml, which can be found in the project directory.
| In step by step mode | In automatic mode |
|---|---|
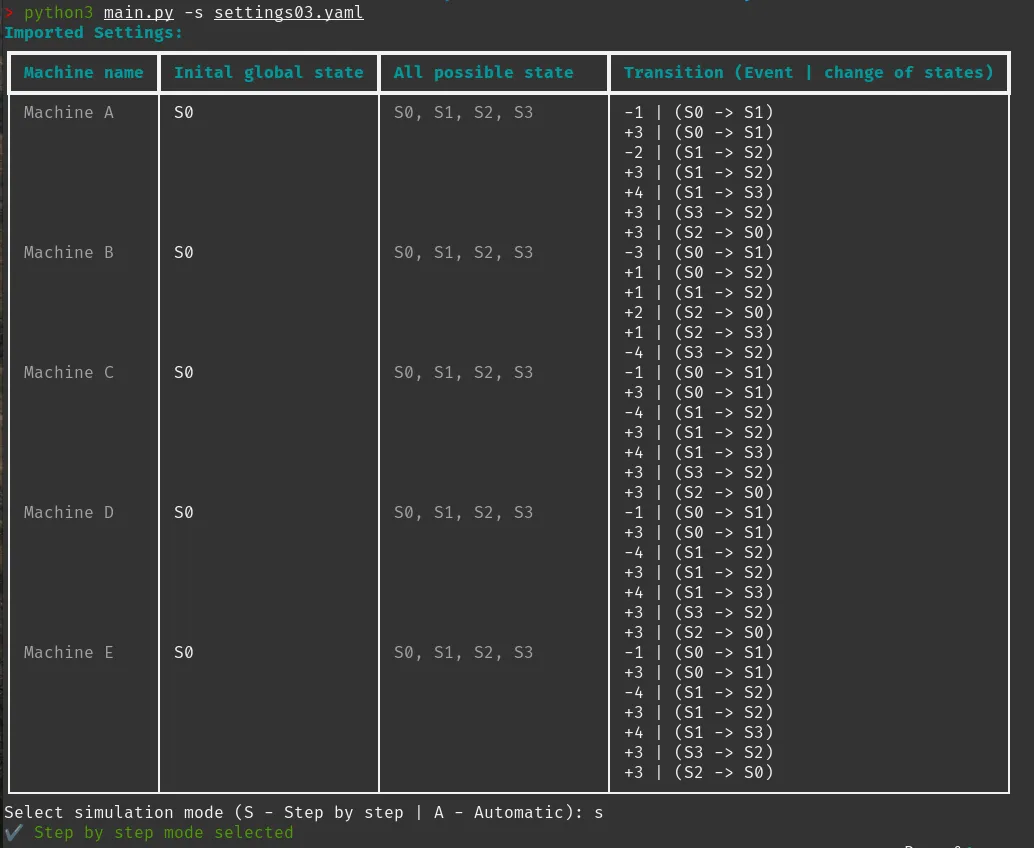 We selected the step-by-step mode 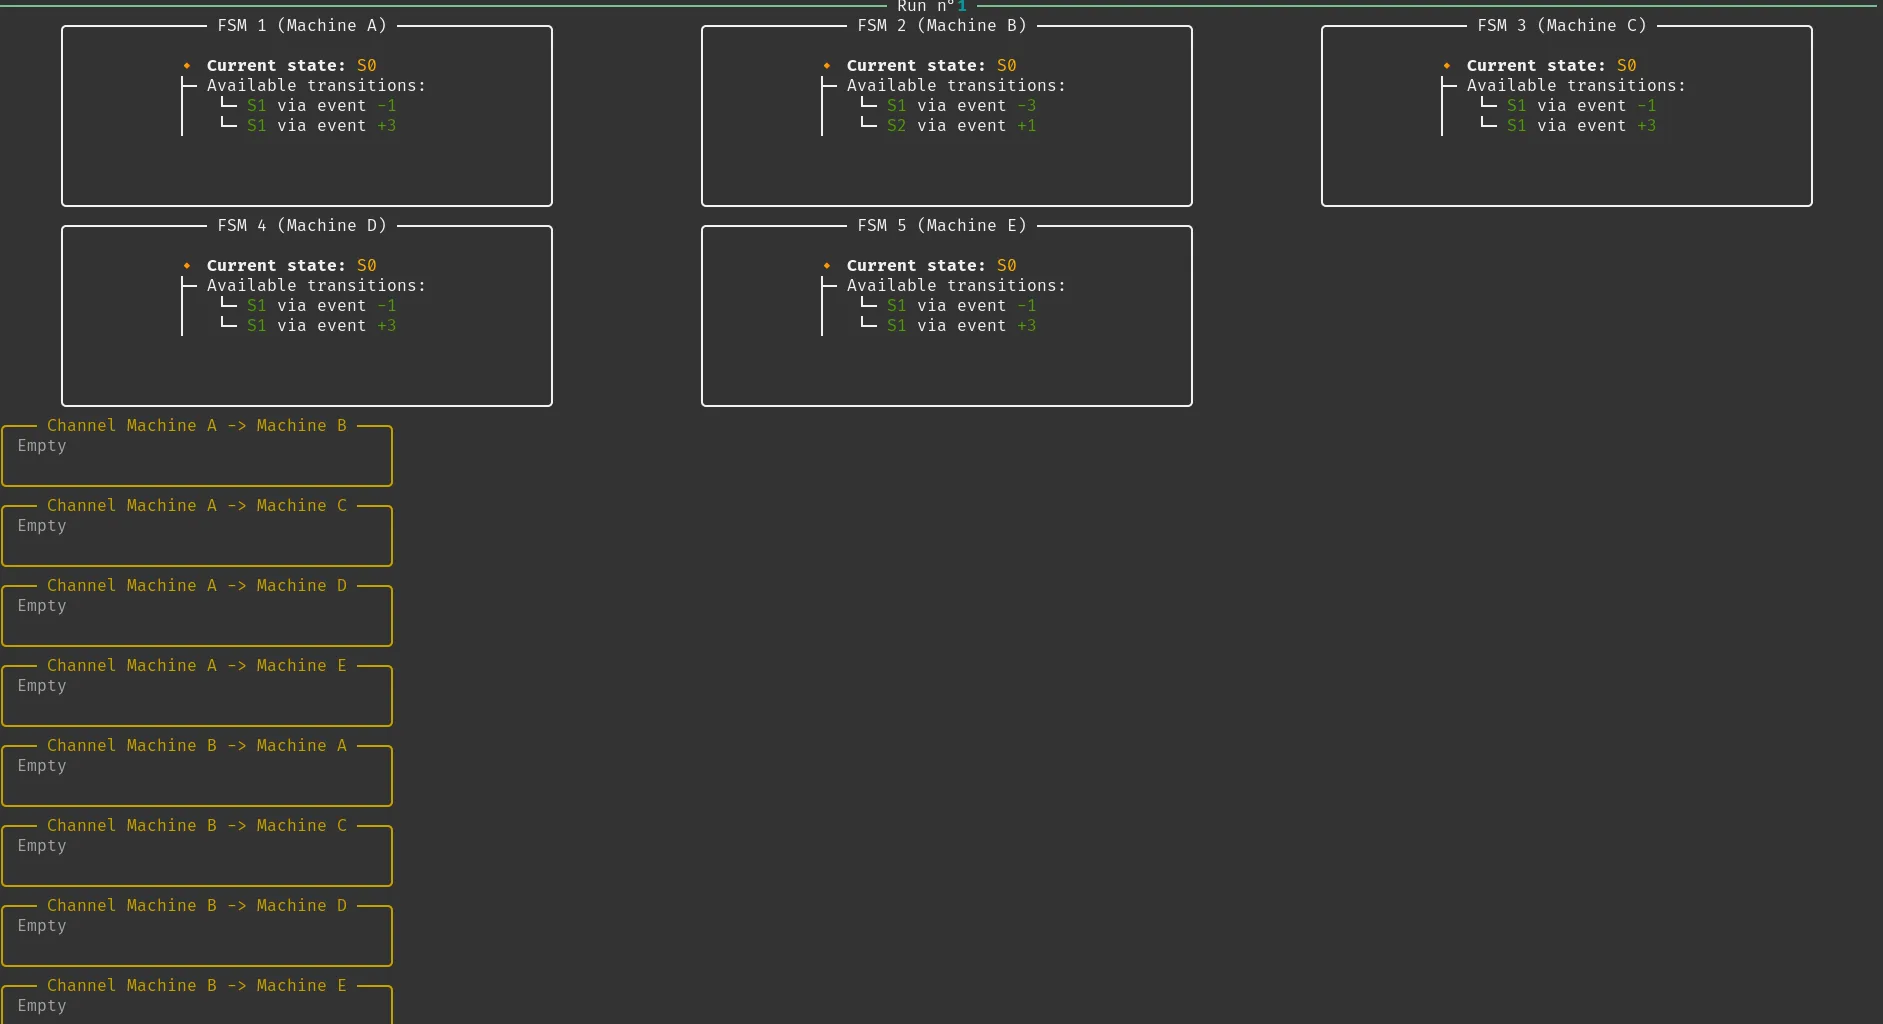 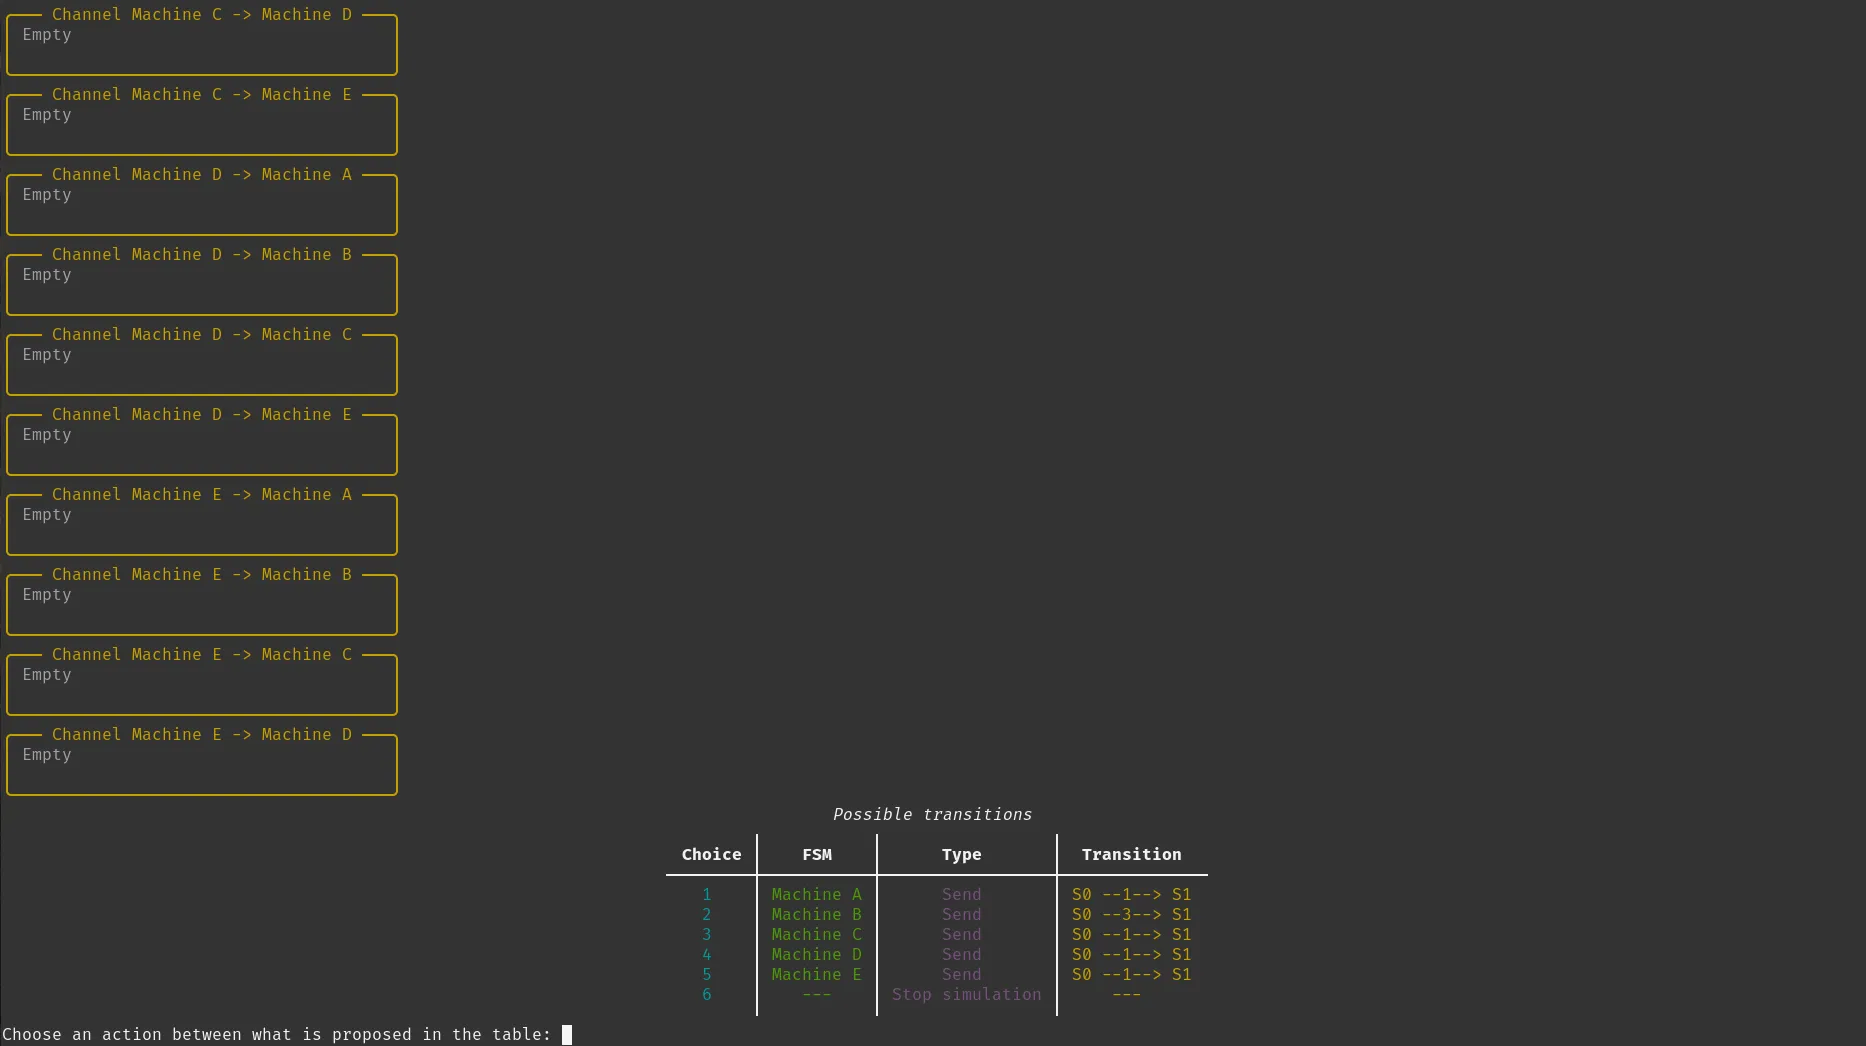 Due to the number of defined channels (in this example 20 channels), the terminal window cannot display all of them simultaneously. Scrolling is required to view the full list. 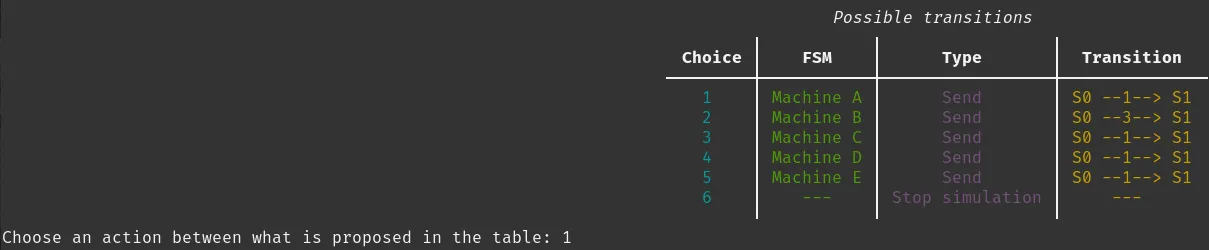 Here, we execute the first available transition Here, we execute the first available transition 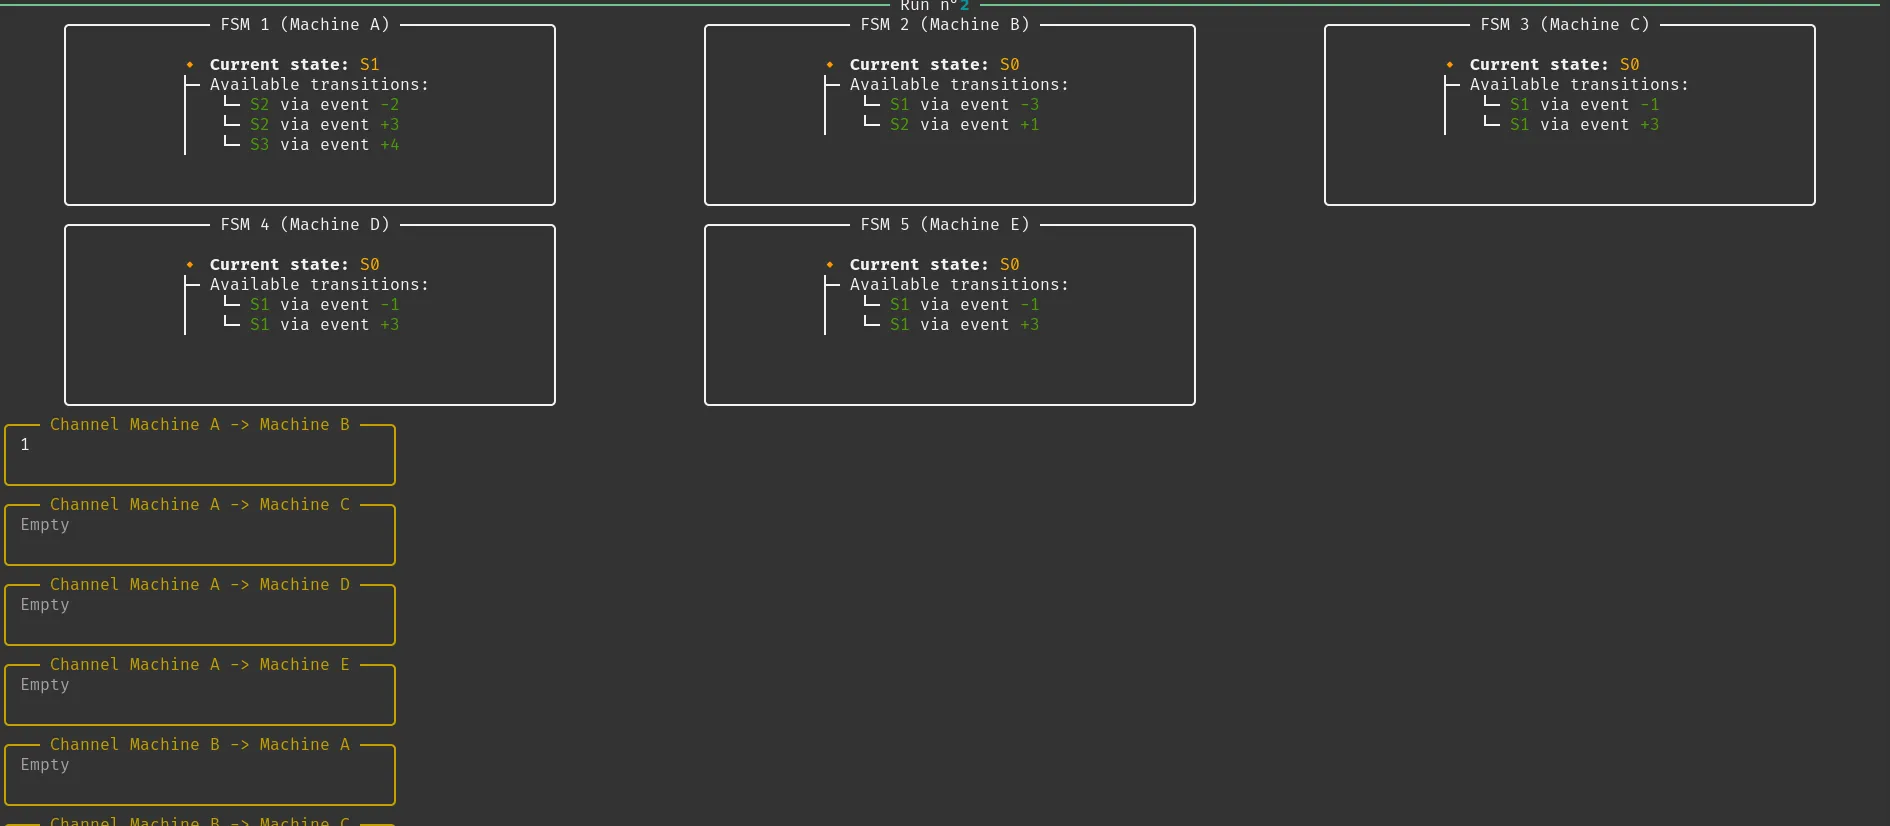  We can see that the correct channel has been updated here. | 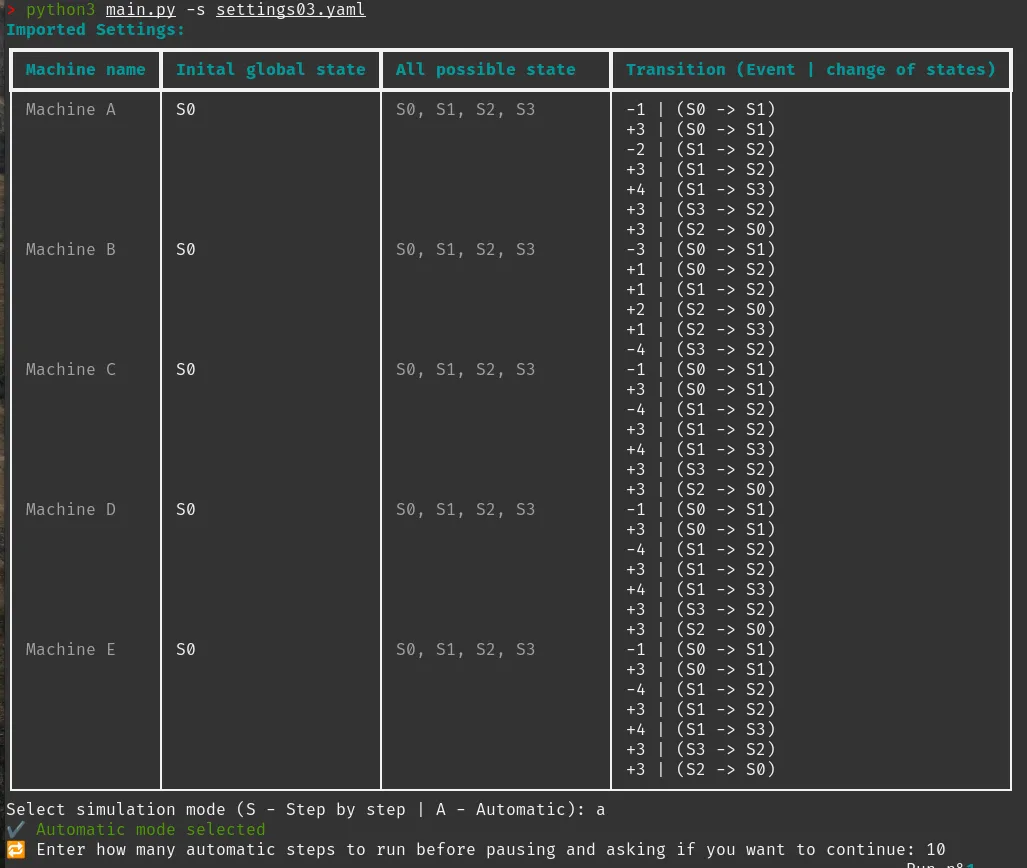 We selected the automatic mode 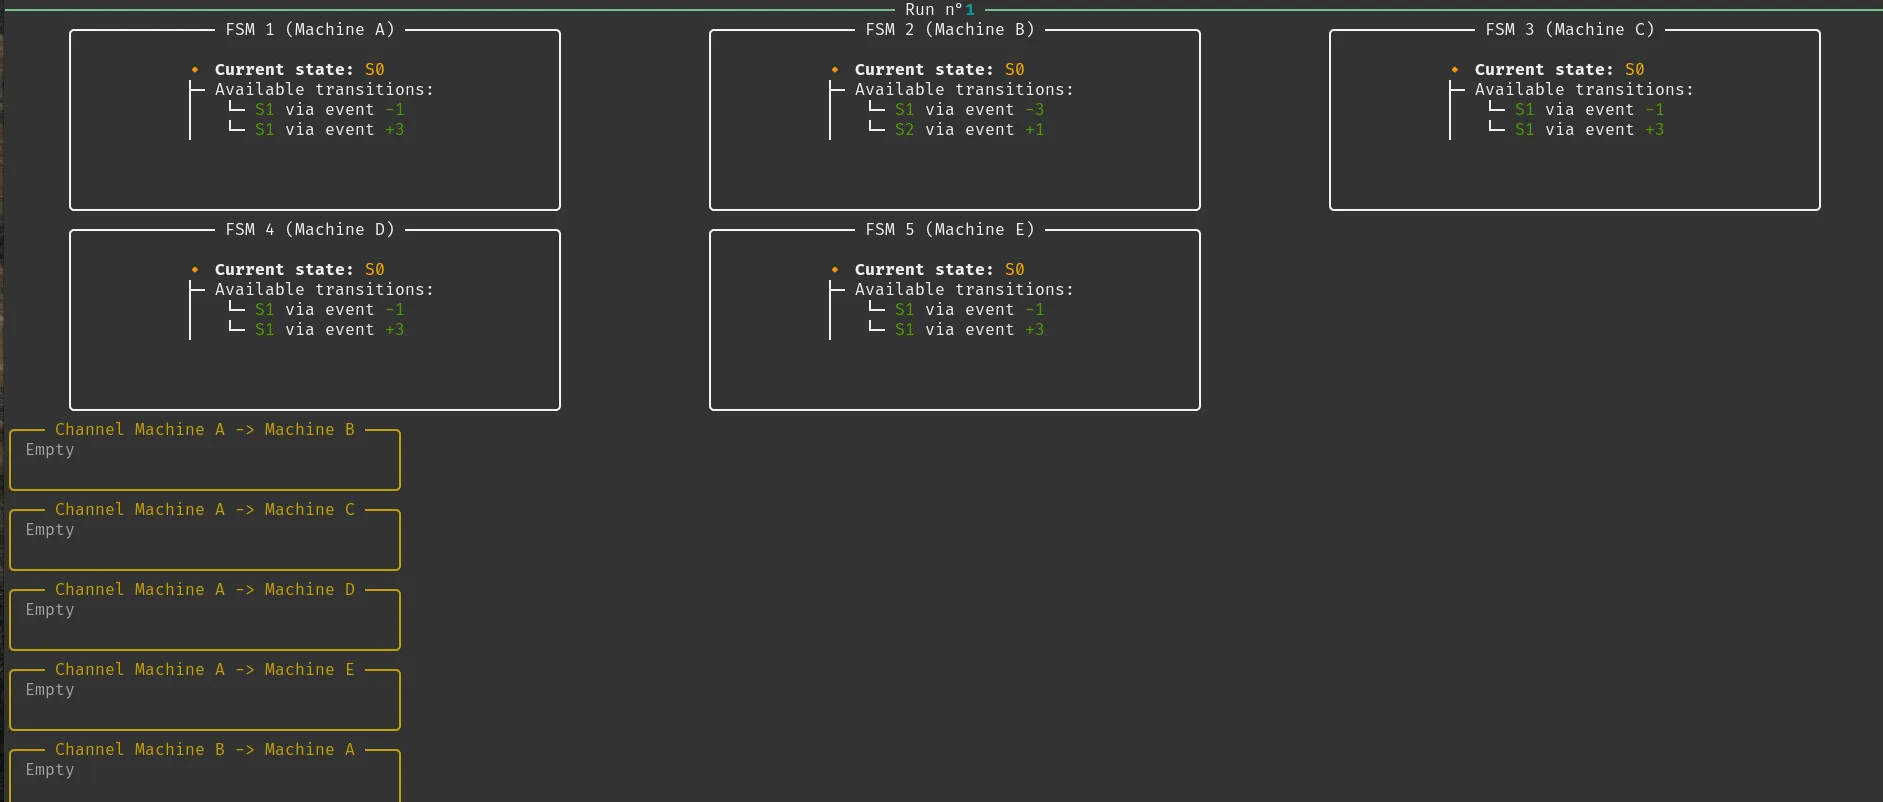 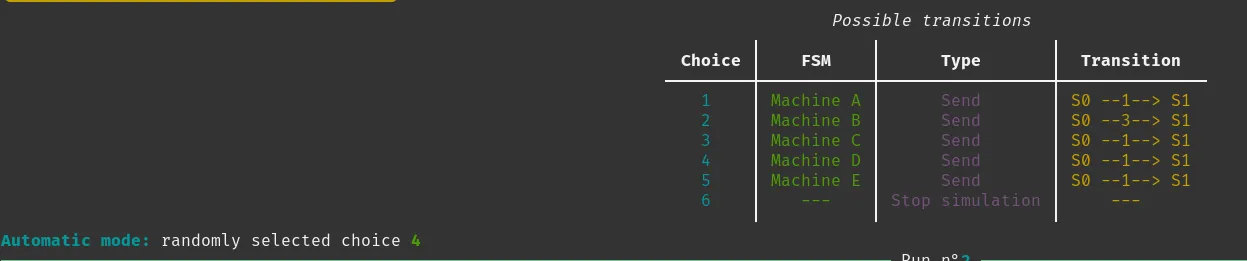 We can see that the automatic mode is still working, so there is nothing new to highlight here. |